


01 Feb Kindness – Undercover Kindness – February, 2015 – Our Plan & Process
Life App: Kindness—showing others they are valuable by how you treat them.
Theme: Undercover Kindness!
Date: February, 2015
Great Ideas…
There have been some wonderful ideas shared on this post about February’s environment. I’ve also seen some terrific photos on the 252 Basics Facebook page. If you have not already done so, I’d love to hear what you have in place for this month’s theme – Undercover Kindness.
Our Plan…
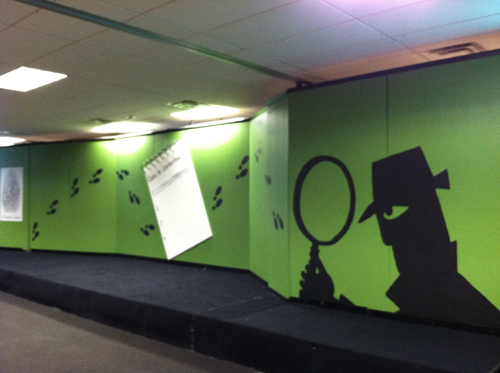 We put our plan together at the last minute this month. We were going in one direction and then everything changed. One of our volunteers came up with a great way to do an undercover theme in a more contemporary way. We love the private eye stuff, but we had done a bit of that when we did Contentment back in 2013, and we thought kids might enjoy more of a current day spy theme – complete with lasers, fingerprint scans, and video technology. As a result- you’ll see below, our Plan A and our Plan B… which is our current plan. The plan we’ve adopted weighs heavily on technology and that is not my forte, so I am relying a lot on my director Nick Blevins for graphics, and the way we will present those graphics. We’ll post finished product photos next week.
Plan A
 Originally, we thought we’d use the theme graphics from 252 Basics as our inspiration.
- Our backdrop was going to be painted a light color (cream, beige or tan).
- The center of the backdrop would be a large graphic or cut letters that said “Secret Agents of Kindness.”
- On either side of that, would be oversized “polaroid” photos of each small group leader. These photos would have the leaders name (i.e. Agent Kim, Agent Steve, etc.) written on the bottom of the polaroid and then we would paper clip them (oversized) to an oversized manila folder.
- I downloaded an app on my phone that lets you take a photo and puts it in Polaroid Format. It’s actually called “Polaroid Camera.” I was just going to have them printed on 11X17 paper and then mount them to manila paper with a tab cut out at the top to resemble a manila folder.
That was going to be it. Simple – and a fun way to represent the Small Group Leaders as Secret Agents of Kindness. Then – one of our genius volunteers came up with a different way to present the photos and that started an entire chain of events that brought us to this…
Plan B
- We wanted to create a Secret Service or FBI headquarters feel, so we set out to create the entrance to a secret agency headquarters.
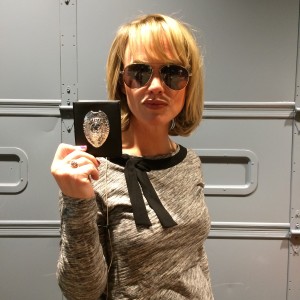 We decided to take a photo of each leader on the entire team (small group, large group, resources, tech, etc) wearing dark glasses and holding a Special Agent badge.
- Those photos would be added to a video graphic that we got from Presenter Media. You can see what it would look like here.
- When large group is not in session, the photos of the Special Agents of Kindness (leaders mentioned above) will loop on two flatscreen TVs that will sit on either side of the stage in front of the backdrop.
- On our stage, we painted the backdrop a darker gray and then created a “vault” in the center.
- The “vault” will have lettering that says “AGENCY C3” – “RESTRICTED AREA” on the door. Our environment name is C3 Kids, that’s why we are AGENCY C3.
- We created an emergency button out of a red siren light that we attached to a circular piece of foam and added wooden discs we painted black to look like rivets. This hangs next to the vault door.
- When large group begins, the flat screen TV’s will have a graphic that says Agency C3 – Secured Area.
 We’ve purchased a light that will project laser beams to “protect the secured area” of the stage.
- Next to our stage, we will have an iPad with an app that “scans” your handprint.
- When large group begins and the host enters, he/she will begin by placing his/her hand on the iPad. When that happens, our tech team will run the Presenter Media video on the flatscreen TV’s and it will appear that the system is scanning and identifying the agent so that he/she can gain access to the area.
- As soon as the agent’s photo comes up on the screen, the lasers will go off and the screen will change to a slide that says – ACCESS GRANTED.
- At the close of large group, we will have the host secure the area again, by reversing the process listed above.


So, that’s our plan. Here is a gallery of photos that include the first part of our process. I will post next week with more detail on the tech stuff and some final product photos.


Don’t forget to send your photos and process our way so we can include them in our February Showcase. You can include them in the comments below, post them on our Facebook or Twitter page or email them to me at lisa [at] readysetsunday [dot] com. Can’t wait to see what you’ve come up with!
